How to Configure LoRa to MQTT
Overview
This guide provides a detailed walkthrough for using a Robustel R1520LG LoRaWAN gateway to transmit data from LoRa nodes to a cloud-based MQTT broker. This setup leverages the built-in ChirpStack Network Server and the Edge2Cloud (E2C) framework to achieve a seamless LoRa-to-MQTT conversion.
1. System Topology
In this scenario, the Robustel R1520LG acts as the central intelligence. It collects wireless data from LoRaWAN sensors, processes the packets using the embedded ChirpStack LNS, and then uses the Edge2Cloud (E2C) protocol stack to bridge that data over a Cellular or Ethernet connection to an external MQTT Broker (Cloud).
2. Prerequisites
Hardware Requirements
- Gateway: Robustel R1520LG.
- LoRa Node: LANVEE CC10LD (used in this demo) or any standard LoRaWAN node.
Software/Firmware Requirements
- Firmware: RobustOS Pro v2.4.1 or higher.
- PC/Laptop: Windows-based with a standard web browser for configuration.
3. LoRa Node Configuration (ChirpStack)
The R1520LG features an embedded LoRa Network Server (LNS) powered by ChirpStack.
3.1 Accessing the ChirpStack Web Interface
1. Log in to the RobustOS Pro web interface (Default: https://192.168.0.1/).
2. Navigate to LoRaWAN > Embedded LNS > General.
3. Click the Click Here link to open the ChirpStack login page.
Note: ChirpStack may take up to 15 seconds to start after the gateway boots.
4. Login with default credentials: admin / admin
3.2 Adding a Device Profile
1. Navigate to Device Profiles and click Add device-profile.
2. General Tab: Enter a name (e.g., "LoRa_Sensor_Profile") and configure the following critical parameters:
Region: Select the frequency band corresponding to your hardware (e.g., EU868).
MAC version: Select the version supported by your node (e.g., LoRaWAN 1.0.3).
Regional parameters revision: Match this to your node's specification (e.g., RP002-1.0.3).
ADR algorithm: Select Default ADR algorithm (LoRa only).
3. Join Mode: Enable OTAA (recommended). If using ABP, disable this toggle.
4. Class: For most nodes, disable Class B/C toggles and will use Class A.
5. Click Submit to save.
3.3 Adding a Gateway
By default, the R1520LG is usually pre-registered in the internal ChirpStack.
However, if you need to add it manually:
In the RobustOS Pro interface, navigate to LoRaWAN > LoRa Setting > General Settings.
Copy the Gateway ID displayed on this page.
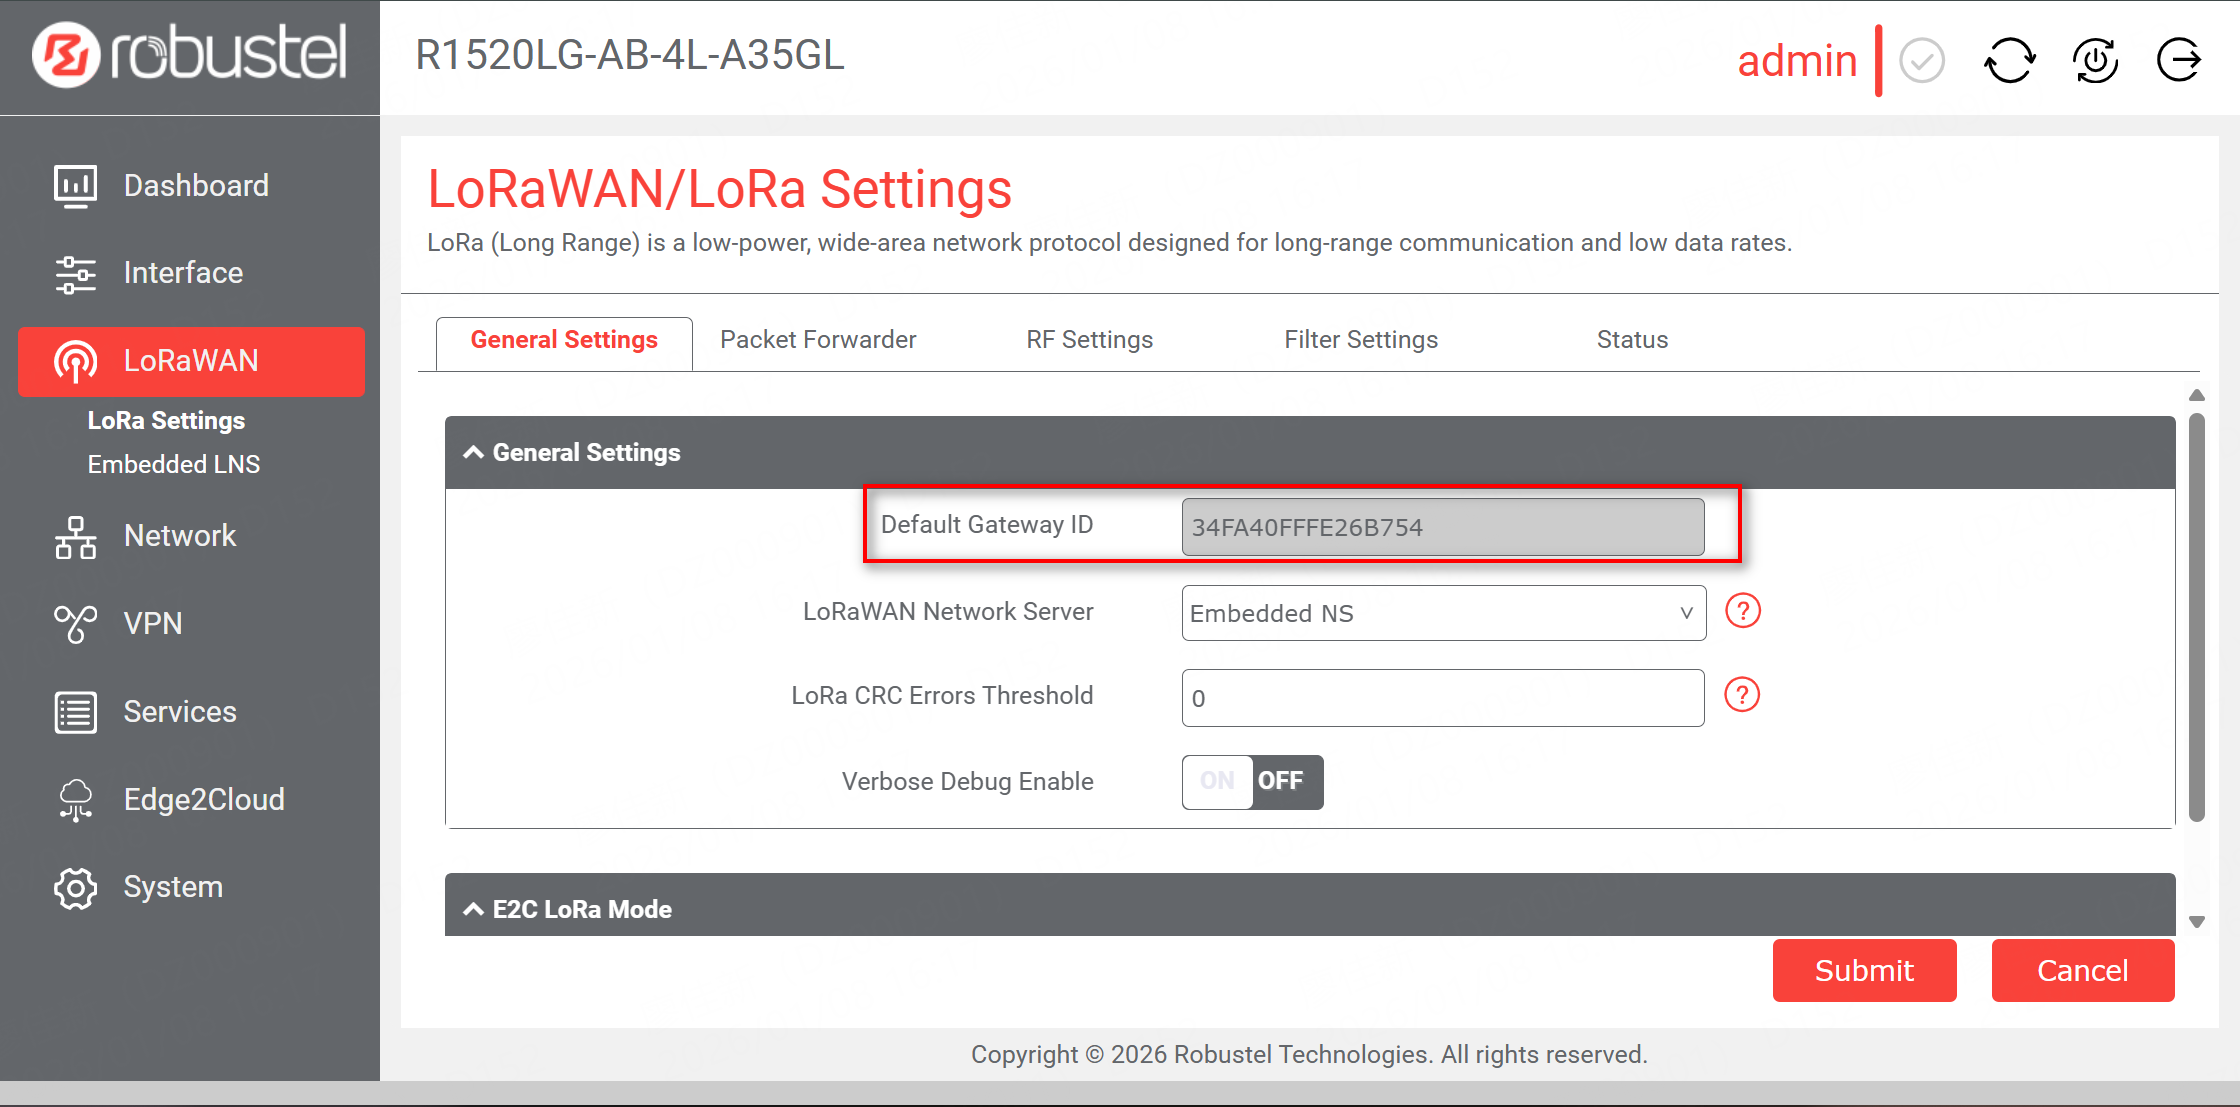
In the ChirpStack interface, go to Gateways and click Add gateway. Enter a name and paste the Gateway ID into the Gateways field.
In the RobustOS Pro interface, navigate to LoRaWAN > LoRa Setting > General Settings.
Copy the Gateway ID displayed on this page.
In the ChirpStack interface, go to Gateways and click Add gateway. Enter a name and paste the Gateway ID into the Gateways field.
3.4 Adding a Device
1. Navigate to Applications > ros-app (created by default) > Devices and click Add device.
2. Device EUI: Enter the unique EUI of your LoRa node.
3. Device Profile: Select the profile created in step 3.2.
4. Click Submit.
5. OTAA Keys: Enter the App Key for your LoRa node and click Submit.
4. Edge2Cloud (E2C) Configuration
The E2C framework decouples the "Southbound" data collection (LoRa) from the "Northbound" cloud transmission (MQTT).
4.1 Enabling E2C LoRa Mode
1. In the RobustOS Pro web interface, navigate to LoRaWAN > LoRa Settings > General Settings.
2. Set E2C LoRa Mode to ON and click Submit.
4.2 Enabling E2C Applications
Navigate to the Edge2Cloud menu and enable the following:
1. E2C ChirpStack: Go to General, set Enable to ON, and Submit.
2. E2C Broker: Go to General, set Enable to ON, and Submit. This acts as the internal data hub.
3. E2C MQTT (Northbound): Go to General, set Enable to ON, and configure your cloud settings:
- Remote Server: Your MQTT Broker address (e.g., broker.hivemq.com).
- Remote Port: 1883 (TCP) or 8883 (TLS).
- Topics: Define your Publish, Response and Subscribe topics.
Click Save & Apply at the top right to commit all changes.
5. Verification & Testing
5.1 Checking App Status
E2C ChirpStack: Should show status as Connected to the E2C Broker.
E2C MQTT: Should show status as Connected to your cloud server.
5.2 Data Flow Test
1. Trigger a data transmission from your LoRa node.
2. In ChirpStack > Applications > ros-app > Devices > [Your Device] > Events, you should see the uplink data in HEX.
3. Open an external MQTT client (e.g., MQTT Box) and subscribe to the Publish topic.
4. You will receive a JSON payload containing the Base64 encoded LoRa data.
6. Troubleshooting (FAQ)
Q1: My node is "Seen" in ChirpStack but no data reaches my MQTT Broker.
A: Ensure the E2C Broker app is enabled. The E2C MQTT app cannot receive data from ChirpStack without the internal E2C Broker service running.
Q2: My MQTT status shows "Disconnected".
A: Check the gateway’s internet connection (WWAN/WAN) and verify that the Remote Server IP/Port and credentials are correct.
Q3: The LoRa node is sending data, but it's not appearing in MQTT.
A: Verify that E2C LoRa Mode is enabled under LoRaWAN > LoRa Settings. Also, ensure the E2C Broker and E2C ChirpStack apps are both enabled.
Conclusion
The Robustel R1520LG LoRaWAN gateway is correctly configured for forwarding LoRaWAN data to an MQTT broker when the node uplink appears in ChirpStack and the expected payload reaches the MQTT broker. This confirms the complete LoRa-to-MQTT conversion path.
Revision History
Revision | Date | Author | Notes |
1.0 | 2026-01-09 | Robert Liao | Initial Release |