How to install the MQTT broker service on EG series devices?
Overview
This article provides a step-by-step guide for installing and configuring the Mosquitto MQTT broker on a Robustel EG series gateway (e.g., EG5120, EG5200) running RobustOS Pro. This setup is ideal for scenarios where you need a reliable, local messaging hub for your IoT devices, such as sensors, actuators, and other smart equipment.
By hosting the broker directly on the gateway, you create a robust and low-latency communication system that can operate independently of cloud services, enhancing the speed and reliability of your local network.
What You'll Need
Hardware List:
- 1 x Robustel EG Series Gateway (e.g., EG5120, EG5200)
Software/Firmware:
- RobustOS Pro firmware V2.3.0 or higher.
- An SSH client application on your computer (e.g., PuTTY, Windows Terminal, or macOS Terminal).
- An MQTT client device or an MQTT client tool (e.g., MQTTX, MQTT.fx) (Optional, only required if other devices on the LAN or WAN need to connect to the broker).
Other:
- Your Robustel gateway must have a working internet connection to download the required software packages.(Note: If your gateway is not yet connected to the internet, please refer to the relevant documentation on configuring cellular or Ethernet WAN connectivity.)
- SSH Access: You need a sudo (administrator) user account to install software. The default admin user for the web UI does not have the correct permissions.
- ✔If you already have SSH access, proceed to the next section
- ❓Need help setting up SSH? See: How to create a sudo user with SSH access on an EG series device
Step-by-Step Configuration Guide
The entire process is broken down into three main stages: connecting to the gateway, installing the software, and configuring the broker.
Step 1: Connect to the Gateway via SSH
Connect to the gateway using your sudo username. The default IP address is 192.168.0.1.
ssh your_sudo_username@192.168.0.1Step 2: Install the Mosquitto MQTT Broker
- First, update the system's package list to ensure you get the latest available software versions.
sudo apt updateThis command may ask for your password. Enter the password for your sudo user to continue.
- Next, install the Mosquitto broker and the command-line client tools. The clients are useful for testing directly from the terminal.
sudo apt install mosquitto mosquitto-clients -y- Once the installation is complete, the Mosquitto broker service will start automatically. You can verify its status with the following command:
sudo systemctl status mosquittoYou should see an "active (running)" status, as shown below.
Step 3: Configure the Broker for Testing
By default, Mosquitto only allows connections from the gateway itself. For testing, we will modify the configuration to allow connections from any device on the local network.
- Open the Mosquitto configuration file using the
vitext editor:
sudo vi /etc/mosquitto/mosquitto.conf- Add the following two lines to the end of the file. This tells the broker to listen for connections on the standard MQTT port (1883) from all network interfaces and to allow clients to connect without a username or password.
listener 1883 0.0.0.0
allow_anonymous true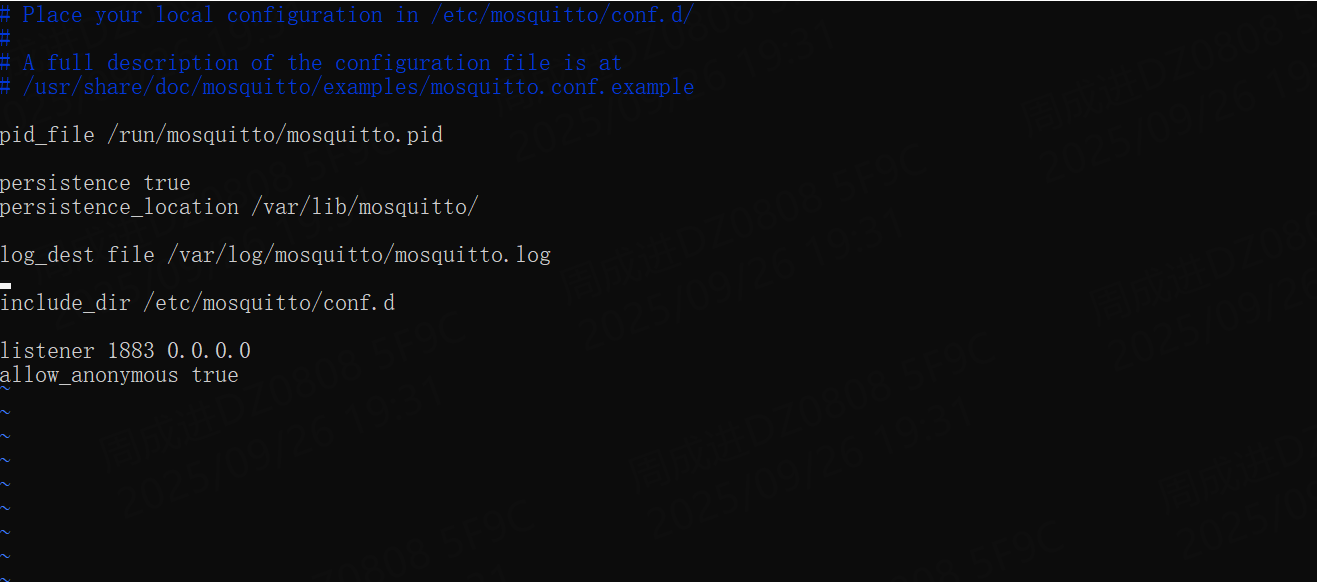
- Save the file and exit the editor by pressing
Esc, then:wq, and thenEnter. - Restart the Mosquitto service to apply the new configuration:
sudo systemctl restart mosquittoImportant: Securing for Production
SECURITY WARNING: The configuration above uses allow_anonymous true, which is suitable ONLY for initial setup, testing, and trusted local networks. For a production environment, this is highly insecure.
For production, you must disable anonymous access and implement a proper authentication and authorization strategy. This includes setting up user/password files and configuring Access Control Lists (ACLs) to restrict which users can publish or subscribe to specific topics.
We strongly recommend you follow the official Mosquitto documentation to properly secure your broker.
Verification & Testing
1. Check Service Status
Before starting the tests, it's crucial to verify that the Mosquitto service is running correctly after all the configuration changes. Connect via SSH and run:
sudo systemctl status mosquittoYou must see an active (running) status. If it is not active, review the previous steps for errors and try restarting it with sudo systemctl restart mosquitto.
2. Local (Gateway) Test
This test confirms the broker is running correctly on the gateway itself.
- While connected to the gateway via SSH, open a second SSH terminal. You will now have two terminals open.
- In Terminal 1, run
mosquitto_subto subscribe to a test topic. It will wait for messages.
mosquitto_sub -t "robustel/test" -v- In Terminal 2, run
mosquitto_pubto publish a message to that topic:
mosquitto_pub -t "robustel/test" -m "Hello from local test"- Look back at Terminal 1. You should instantly see the message appear:
robustel/test Hello from local test
This confirms the broker is working locally.
3. Test from a LAN Client (e.g., your PC)
This test confirms that other devices on the same local network (LAN) can connect to the broker. Perform this test only if you need to allow other devices on the network to communicate with the broker.
Note on Remote (WAN) Access: This test is for the local internal network. By default, this traffic is allowed. If you need to access your MQTT broker from the external network (WAN/Internet), you must configure a firewall rule to allow this traffic. For instructions, please see How to open a firewall port on an EG series gateway.
- Configure MQTT Client Connection:
- Open your desktop MQTT client tool (e.g., MQTTX).
- Create a new connection.
- Host: Enter the IP address of your Robustel gateway (e.g.,
192.168.0.1). - Port:
1883 - Leave
UsernameandPasswordblank (as we allowed anonymous connections for testing). - Click Connect.
- Subscribe and Publish:
- Once connected, subscribe to a test topic. For example, enter
robustel/test/messageand click Subscribe. - In the publishing section, set the topic to the same value (
robustel/test/message) and type a message (e.g., "Hello from Robustel Gateway"). - Click Publish.
- You should instantly see the "Hello from Robustel Gateway" message appear in the subscription panel. This confirms your broker is fully installed, configured, and accessible from the network.
Troubleshooting / FAQ
Q: The apt install mosquitto command fails.
A: This command requires an internet connection.
- Log in to the gateway's web UI and check the
Internet Statuswidget on the System Status -> Overview page. - Verify that the gateway has an active WAN connection (e.g.,
wwan) and a valid IP address.
Q: My MQTT client (from the LAN) cannot connect.
A: This is the most common issue. Check the following in order:
- Service Status: Connect via SSH and run
sudo systemctl status mosquitto. Ensure it is "active (running)". - Mosquitto Config: Double-check your
/etc/mosquitto/mosquitto.conffile. Usinglistener 1883 0.0.0.0makes the broker accessible from all network interfaces on the gateway. If you did not configure it this way, you must ensure the service is listening on an IP and port that your client can reach. For example, binding to the gateway's LAN IP (e.g.,listener 1883 192.168.0.1) will prevent WAN devices from accessing it. Binding to the WAN IP will prevent LAN devices from accessing it. Always ensure your client is connecting to the correct IP and port that you have configured in this file. - Anonymous Access: Ensure
allow_anonymous trueis in the config file. If you set up passwords (as per the Production warning), you must provide the correct username and password in your client. - Network Access: This guide only covers LAN (firewall
internalzone) access. If you are trying to connect from the LAN, check your client's IP and the gateway's IP. If you are trying to connect from the WAN (firewallexternalzone), you must add a specific firewall rule as noted in the "Optional: Test from a LAN Client" section.
Revision History
Revision | Date | Author | Notes |
1.0 | 2025-09-27 | Jens Zhou | Initial Release |
Related Articles
How to Deploy Zabbix for SNMP to MQTT Data Forwarding on EG/MG Series
Overview This guide describes how to manually configure a Robustel EG/MG series gateway (running RobustOS Pro) to act as an SNMP collector and MQTT forwarder. By deploying Zabbix Server and Agent 2 via Docker, the gateway can poll data from local ...How to Deploy Zabbix and SNMP Data Simulation via MQTT on RobustOS Pro
Overview When using Robustel's EG series gateways (such as the MG460) running RobustOS Pro, users may need to monitor end-device data using Zabbix via SNMP and MQTT protocols. This comprehensive deployment solution bridges end-devices to a Zabbix ...How to Install Node-RED on EG Series Devices via Docker?
? Overview This document outlines the procedure for deploying Node-RED on Robustel EG Series Edge Gateways. Node-RED is a flow-based programming tool, originally developed by IBM, which allows for visual programming to wire together hardware ...How to install N3uron using the official installation script on an EG series gateway?
? Overview This guide provides instructions for installing N3uron, a powerful industrial IoT edge platform, on Robustel EG Series gateways running RobustOS Pro. Integrating N3uron with Robustel's edge hardware allows for seamless data orchestration, ...How to Install Docker on Robustel EG Series Gateways via Debian Package Manager
? Overview This document outlines the procedures for installing the Docker Engine on Robustel EG series edge computing gateways (running RobustOS Pro). By leveraging the device's Debian-based architecture, users can configure official Docker ...